Installing CHDK Firmware on a Canon EOS 350D Using Linux

Important Notice:
Caution: Installing alternative firmware like CHDK may void your camera’s warranty (though for a 2005 model, it’s likely expired) and carries a risk of bricking your device. Proceed with caution and at your own risk.
The Canon EOS 350D, also known as the Digital Rebel XT, is an 8.0-megapixel digital SLR camera released in 2005. Installing alternative firmware like CHDK (Canon Hack Development Kit) can unlock additional features and capabilities. Here’s how I installed CHDK firmware using a Linux OS, adapted from a detailed blog post from Max (in German) that originally focused on Windows OS.
Steps to Install CHDK Firmware: #
-
Prepare the Compact Flash Card:
- I had the most success when I formatted the Compact Flash (CF) card in the Canon EOS 350D camera itself.
- Insert the CF card into a card reader connected to your Linux system.
-
Download CHDK Firmware:
-
Copy Firmware to CF Card:
- Check if the CF card is automatically mounted. If not, mount the CF card manually. Use
fdisk -lto identify the device name, then mount it:sudo mount /dev/sdX1 /mnt/cf - Copy the
scanled.firfile from the1-Firmwarefolder within the extracted zip file to the root directory of the CF card:sudo cp path_to_extracted_zip/1-Firmware/scanled.fir /mnt/cf
- Check if the CF card is automatically mounted. If not, mount the CF card manually. Use
-
Install the Firmware Patch on the Camera:
- Ensure your camera’s battery is fully charged before proceeding.
- Safely unmount the CF card and insert it into your Canon EOS 350D.
- Turn on the camera, navigate to the firmware update option, and follow the instructions to load
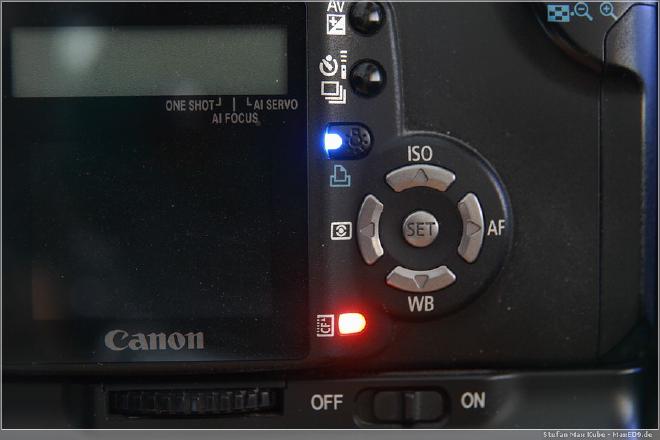
scanled.fir. This file patches the camera bootloader to enable booting from the CF card. - After selecting OK, the direct print button will light up blue permanently. After 30 seconds, turn off the camera and remove the battery. In my case, turning off the camera did not work, so I had to remove the battery to turn it off.

-
Make the Card Bootable:
- Reinsert the CF card into your Linux system.
- Use the
make_bootable.shscript from the eos-bootable project to make the CF card bootable. This tool requires the CF card to be formatted in the camera beforehand.git clone https://github.com/graugans/eos-bootable.git cd eos-bootable cmake -B build cmake --build build cp build/exfat_sum . sudo ./make_bootable.sh
-
Verify the Bootloader Patch:
- To ensure the bootloader patch works correctly, copy the
autoexec.binfile from the1-Firmwarefolder to the root directory of the CF card:sudo cp path_to_extracted_zip/1-Firmware/autoexec.bin /mnt/cf - Safely unmount the CF card and insert it into the camera. The red and blue LEDs should now flash alternately.
- To stop the flashing, remove the battery and briefly remove the card.
- To ensure the bootloader patch works correctly, copy the
-
Load CHDK Firmware on the Camera:
- Copy
autoexec.binfrom the2-Autoexecfolder to the root directory of the CF card:sudo cp path_to_extracted_zip/2-Autoexec/autoexec.bin /mnt/cf - Safely unmount the CF card and insert it into the camera, close the lid of the CF card slot. The blue LED and the CF LED should flash briefly, signaling the successful execution of
autoexec.bin.
- Copy
-
Accessing CHDK Features:
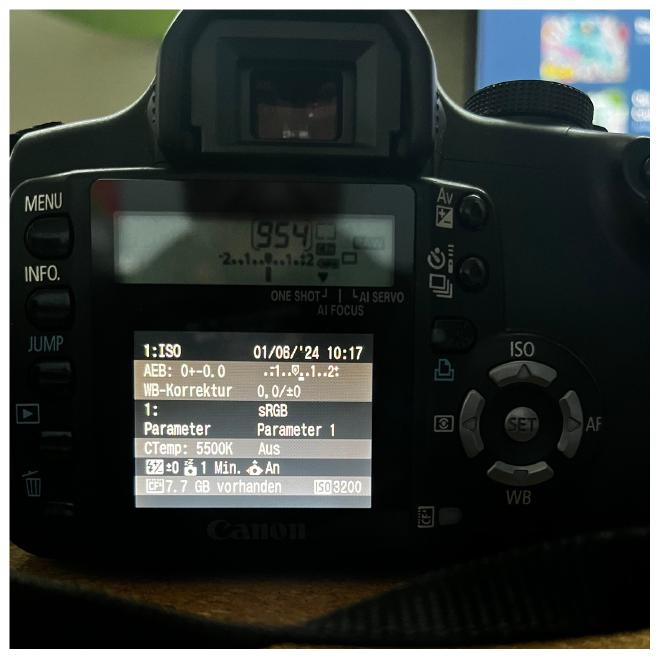
- Once the CHDK firmware is loaded, you can access new features by pressing the INFO button. Use the up/down buttons to select the respective function and the left/right buttons to change the options. Here are the available options:
| No. | Function | Description |
|---|---|---|
| 1 | ISO | ISO settings in third increments from ISO 100 to ISO 3200 (HighISO) |
| 2 | WB | White balance, including all available options and color temperature |
| 3 | CTemp | Color temperature |
| 4 | Metering | Existing measurement methods and spot measurement |
| 5 | AEB | Activate and select values for the AEB function up to ±6.7EV |
| 6 | CF-BSeq/AutoC | Setting the exposure bracketing sequence and automatic deactivation of AEB |
| 7 | CF-SI Disp. | Deactivate/activate the red focus points in the viewfinder |
| 8 | CF Menu Posi. | Select which menu should be activated when you press Menu |
| 9 | CF-Safe.Shift | Safety Shift in the AV and TV programs causes the camera to change aperture or time values if needed |
| 10 | CF-L.AFButt | Changes the function of the AF stop switch on IS lenses |
| 11 | CF-Decis.Da. | Adds more data to the photo, requires additional software |
| 12 | CF Flash | Flash on or off when opened |
| 13 | Shutt.Count | Shows the number of shutter actuations |
Camera Behavior with Different CF Cards #
When the camera is powered on, it will behave as follows:
- Without a card in: Warning message “No CF card” will be displayed on the LCD screen.
- Without a bootable card: No message displayed on the LCD screen (default behavior of the camera).
- With a bootable card and a correct
AUTOEXEC.BINfile in the root directory of the card: The camera will execute theAUTOEXEC.BINfile, with no message displayed on the LCD screen. - With a bootable card but no
AUTOEXEC.BINor a badAUTOEXEC.BINfile: The camera will turn on and show a message on the LCD screen about the lack of anAUTOEXEC.BINfile.
Using the CHDK firmware enhances the functionality of the Canon EOS 350D, allowing for more creative and technical flexibility in photography.
For more details, you can check out the Canon EOS 350D Wikipedia page and CHDK Wiki.